Thursday, March 31, 2011

In the Art Room - One Point Perspective

We spend at least two quarters, if not more, on perspective in the fifth grade.  The kids start bringing sketchbooks to art for the first time in fifth grade and we put them to use immediately for these lessons!  They are always amazed at how cities and landscapes are shaped using a vanishing point and a horizon line.  I rotate form year to year between drawing a hallway, a city, and a room in one point perspective for their first lesson.  This year we did hallways and they were fantastic!


There were several components each hallway had to have.  They all needed to be in one point perspective of course.  They needed to end at a doorway that opened out to somewhere else, they all needed either a patterned floor or a carpet, they needed at least one door in the hall, they needed one light fixture on the ceiling, and the needed to have an offshoot hallway.  They did a great job!

Wednesday, March 30, 2011

In the Art Room - Lizards

I like to do at least one 3D project with my third grades every year, but my materials are limited.  One year we made paper lizards which I loved!  They were super easy and the kids were so pleased with the results.  The body was made out of a long, skinny triangle.  Each scale was a wide V shape.  They had to make 6-8 V's that started small and got increasingly larger.  The smallest was for the tail which was the point of the triangle and the largest was for the head which was at the straight end of the triangle, opposite the point.  They bent each V in half and glued them to the long triangle body.  We added long lizard legs, a curled pink tongue and googly eyes to finish.

3D Paper Iguanas


Art Class Works  also has a 3D paper Iguana project with instructions:
 
 I love how she displayed these on the wall!

Tuesday, March 29, 2011

In the Art Room - Twisted Snakes

I saw a similar project on Deep Space Sparkle for second graders that I modified for my fourth grades.  We learned how to draw a snake as though it was twisted around a tree branch.  We made several sketches before working on the final piece.  The most challenging part was not the twisting, but was making the snake wide enough to not get lost on the page.  We started out with some very skinny snakes!  The kids used oil pastel and watercolors to complete the project. 
Here's the snake from Deep Space Sparkle:


Here are our snakes:


Monday, March 28, 2011

In the Art Room - Pointilist Seascapes

We differentiate between landscapes, seascapes, and cityscapes in the 3rd grade.  This year, I had the kids use Q-Tips to paint a seascape with dots in the style of Georges Seurat.  I encouraged them to mix colors by layering dots, rather than using their Q-Tip to blend two colors together.

Le Bec du Hoc, Grandcamp by Georges Seurat


Friday, March 25, 2011

In the Art Room - One Line Ducks

The kinders learned how to use one continuous, curvy line to draw a duck today.  They started with the number 3, followed my directions, never lifted their pencils from the paper and drew a duck!  Then they repeated two more times and added a background with paint and oil pastels.  I love them!


Thursday, March 24, 2011

In the Art Room - Sculpture

I read a post from Mr. E recently about how he has never been a big sculpture teacher, and even though it's part of my curriculum, I really haven't been either.  I was inspired by the wire sculptures he made with his 4th graders and decided to alter it a bit for my 8th graders.  They started yesterday, and didn't get too far so we'll have to wait to see what they come up with!

One successful 3D project I have done for several years is a Francois Pompon inspired lesson.  I don't have a kiln, so I use air dry clay.  Each 8th grader makes a small practice sculpture out of model magic.  Then they use Prang Air Hardening Modeling clay for the final piece.  Some of the best advice I have found when teaching kids about sculpture is that you have to be willing to allow it to “morph” into something totally different while you are working on it!  They painted the finished pieces with acrylic paint. 
       

In the Art Room - Virginia Cardinals

Every year I do a cardinal lesson with the first grade, as the cardinal is Virginia's state bird (and they're super easy for the kids draw!).  This year, they used simple, geometric shapes to draw the cardinals - ovals and triangles.  Then they painted the birds with tempera, drew on details with oil pastels, and rubbed a chalk pastel of their choice for the background.  I think they came out very springy!
   

My lessons will often have the same theme, but I like to change how I implement them from year to year. Here are a few first grade cardinals from past years:


Wednesday, March 23, 2011

DIY Inspiration - Lego Table

I saw this DIY project on Made by Rae.  Their project was clearly for a playroom as it was quite large.

I made a smaller version of this table for my 5 year old's bedroom.  
The table is an end table I got at Ikea for $7.99 and the stool was also from Ikea for around $7.00.  I ordered the Lego plates from Amazon - I think I paid less than $20 for all four.   It's the perfect size for his small bedroom and he loves playing with it!


Tuesday, March 22, 2011

DIY Inspiration - Sidewalk Paint

I LOVE my neighborhood!  I'm always on the lookout for new activities for the kids that will keep them occupied while the moms relax.  I think I found a winner from Procrastination Station.   I'm just not sure if the paint will end up on the sidewalk or the kids!
 

Monday, March 21, 2011

How to Draw - Lions

I spend a lot of time with my Kindergartners on directed drawings.  We take the first two or three months of school discovering how shapes and lines go together to make an image.  I have found the directed drawings we do to be some of the most popular lessons with the kids and their parents.  The children are always so pleased and proud with their finished products!  Here is a quick peek at how I taught the lion lesson.

We began by dissecting the image to discover exactly which shapes and lines we would need. 
After we identify the elements we need, I give them their jumping off point, which in this case
was the large "U".
Now they listen to my oral directions and add the rest of the pieces!


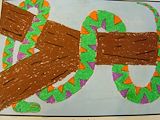
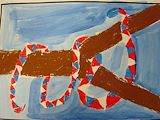
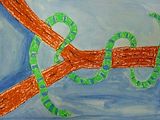
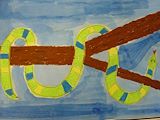
Once the drawing is complete, we always outline our work with a black crayon.  We used watercolor paint for the lion's face and tempera paint for his mane.  As we draw, I always ask the kids how they could turn their drawing into something else.  I got some great answers with the lions!  Around steps 1 and 2 the kids said they could stop with the lion and make a flip flop instead.  Once we added ears, a lot of kids said we could stop and turn him into a bear or a monkey.